Monday, March 26, 2012

Smelting at Smeltfest


This clip shot by participant Jesus Herandez

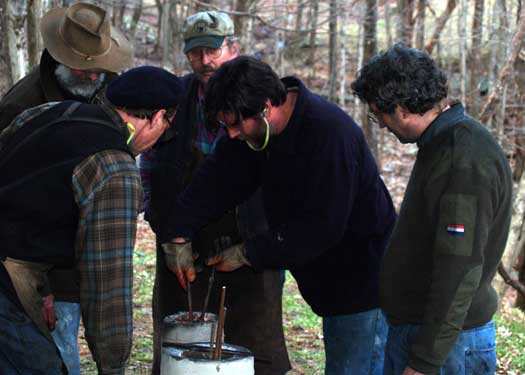
This clip from our third smelt during Smeltfest 12 shows a number of reasons why my participation there is valuable (to me!).
The concentration at Smeltfest this year was in part on working with a new magnetite ore.
On our first smelt, we did not produce any iron. After some consideration, the thought was that we had purified the ore (double magnetic sorting) too much, not leaving enough glass producing elements to create the correct working slag bath inside the furnace.
On the second smelt, the result was a (quite surprising) 'white' cast iron. Not what we expected at all.
On the third smelt seen here, the result was a solid bloom of a middle carbon steel. Perfect!

You get some idea of how a well skilled *team* is the ideal situation, as well as having access to some large scale equipment.
During the extraction itself, Lee Sauder is managing the opening of the furnace and pulling the bloom. I normally work as 'safety man' - shovelling away hot fragments and burning charcoal, plus keeping the tools close at hand and in some kind of order.
As soon as Lee extracts, the bloom is weighed (on a large scale) and then quickly transferred to a thick steel plate set into the ground. At this point two hammer men (Steve Mankowski and Shelton Browder here) strike over the surface to both knock off the loose slag. and compact in any looser bloom fragments. (1)
At that point the bloom is loosing its initial heat. You see the action jump into the main forge area, where Lee has set up a special side draft coal forge. Once re-heated back to a welding temperature, again Steve and Shelton hammer the surface, increasing force as they compact the bloom further.
Next the bloom is transferred over to Lee's 300 pound mechanical hammer. Not only massive power, but also this hammer has an extremely large working surface. You see the bloom compressed into a puck, then that flat disk cut into quarters using a pair of specially designed cutters under the power hammer. (2)

Last, there is a sequence showing Skip Williams spark testing a still hot quarter section to determine carbon content. (3)

Just to prove there is still more art than science in bloom smelting, our fourth attempt *should* have produced another flow of high carbon cast iron. The result? Middle carbon steel again, although not with the same yield or consistency as smelt 3.
Hmm - some more consideration and experimentation seems in order here!


Meanwhile, back to Wareham :

1) The team I normally work with at Wareham does not regularly include any trained blacksmiths. I'm usually pretty much exhausted by the time I get a bloom pulled. So my normal ability to make the best use of the extreme heat of a freshly extracted bloom is quite limited.
On any secondary attempt to heat and work a bloom mass , I rarely have any assistance - so must hold and cut working alone.
2) The small air hammer in my shop is only 50 pounds head weight. More significantly, it has a very small working table, only 4 x 1 1/2 inches. This makes it extremely difficult to balance an irregular bloom and compress or work it.
This is why the start of the Bloom to Bar project has been taken up by preparing a new 30 ton hydraulic press.
3) My objective (like the historic one) has been to produce a *low* carbon iron. This softer material is much easier to forge into objects.

Saturday, March 24, 2012

Why Corning GLASS ?

(day 39)

Still on the Reasearch trip...


(Sorry - its a horrible image)

F- 'Split Fire Riser'
R- 'Solar Riser LH4'
Thomas Patti - 1943

Yup - these are glass.
So?

Imagine this type of form made out of a slab of thick steel...

(more to come, with fuller explinations on how one plastic medium might inspire another)

Tuesday, March 20, 2012

Smeltfest B

(Day ??)

Sunday proved to be one of the best all round days at a Smeltfest from the last several years. Participants had followed their interests, attacking several aspects of a general problem. There were four groups, all working around the edges of the rear smelting area at Germinal Ironworks.

Lee Sauder, assisted by primarily by Therese Kearns, repaired and fired the iron furnace again. After two full smelts on the previous two days, Lee hoped he had figured the right combination and sequence to produce a bloom from the magnetite ore. The first smelt on Friday had not produced much slag - or any iron. The second on Saturday had reduced the ore, but the product was a unforgeable cast iron.
Success! Roughly 60 kg of magnetite was reduced to create an un-compacted bloom at 17 lbs. On initial compaction (first by hand and then under the large mechanical hammer) the product was found to be a nicely consistent higher carbon metal. After more or less 'bracketing' the smelting process with the previous two (pretty much) failures, Lee was quite happy to have nailed the right sequence of working this new ore.


Lee (L) assisted by Steve Mankowski -
Compacting the bloom under the large mechanical hammer. (*)

Working inside the main shop, Skip Williams was preparing various samples of the earlier slags and bloom fragments for examination under microscopes. Skip better understands the various components seen at different stages of the ore to metal process. He kept pulling all of us over to have look and explain just what we were seeing - and how this could apply to our understanding of the overall mechanisms we were involved with.
Shelton Browder assisted with this, as well as working on another examination. An antique axe of unusual construction (at least to modern eyes) was polished and etched. This allowed some insights into historical use of bloom and wrought iron metals.

One of the large projects intended for Smeltfest this year was to experiment with a smaller re-melting hearth. Steve and Jesus Herandez worked on this. Jesus has a specific historic point of reference - Japanese swords from before roughly 1700. He explained that this marks the start of the direct bloomery tatara system. Before that point, the process involved producting a high carbon cast iron, which was then re-processed in a secondary hearth to remove excess carbon until the metal could be forged into blades. This step in the sequence is not very well represented in archaeology or documents, so is a bit of a mystery. He said that pre-1700 blades have a distinctive quality that distinguishes them from later ones. Modern methods are yet to duplicate this quality.
At Smeltfest 2011, archaeologist Tim Young (from England) had told us about ancient remains from England and Ireland which appear to be the result of a similar process. Therese had focussed part of her academic researches into studying of these hearths. Taken with Skip's early research and the Smeltfest 2008 work on the Aristotle furnace, this investigation suggests many possibilities.

The test re-melting hearth.
An ingot of high carbon steel is just being removed - created from cast iron material

My project for the day was working with the smaller Aristotle furnace. Although the group had done considerable experimentation here, both together and individually, it turned out that not many tests of *reducing* carbon had been undertaken. In a series I did with Gus Gissing (back at Wareham) two years back one of the tests had been using small pieces of cast iron from a failed smelt attempt. My duplication on Sunday once again showed that the Aristotle furnace could also be used to reduce the carbon down to a useful level. It appears the system first removes the bulk of the carbon present, then re-applies carbon to an amount that is regulated by the way the furnace is physically set up inside. This may be a significant discovery.

The Aristotle furnace in operation - early in the sequence.

Of course, this is just some of the overall work and experimentation that goes on during a typical Smeltfest! Not to be discounted is all the time for conversation and sharing of ideas and problems.


(*) The process used to convert this raw bloom into something ready for further forging illustrates once again why part of my own OAC project has included some work on a hydraulic press. The hot bloom is pulled from the furnace, and its surface worked over with sledges on a metal plate to break off the loose 'mother' slag coating. This is done working on the ground, the strikers squatting almost African style. Then the exposed bloom is rushed to the forge to re-heat. Further compaction, from a half bowl to a slightly flattened puck, is done with a pair of strikers wailing away with heavy sledges.


Shel and Steve (L & R) using sledge hammers for the first compaction steps, working under Lee's direction.

Next, Lee moves over to his massive (200 + lbs) mechanical hammer to reduce the puck to a block. This is then cut into quarters, again under the mechanical hammer.
(as seen above).
Obviously, I personally do not have access to either the skilled labour, or more importantly, the large power hammers that Lee has. The new hydraulic press is thus critical to my ability to work similar large bloom masses.(Which of course is what the OAC Grant is all about!)

Sunday, March 18, 2012

Smeltfest A

This is just a fast taste of what is happening at Smeltfest. Sorry there are no images, with the confusion of working from the road, my camera cables are up at the workshop this morning.

The first day in the later afternoon and evening was really scheduled as a travel day. As people arrived, we cleared off the large 'Africa' furnace from last year. Another long task was roasting and crushing ore for this year's series.

The first official day started with preparing charcoal, with several hundred pounds worth to be hauled, crushed, sized and screened. Others worked on preparing Lee Sauder's production smelter for use. A third group worked up clay mixture for the various small furnaces and hearths under consideration this year. Skip Williams supervised the construction of an Aristotle re-melting furnace. I worked at all these tasks to some degree. Later in the afternoon, I showed Therese Kearns (an archaeologist participating from England) how the Aristotle worked. In the background from about noon on, Lee and Jesus Herandez ran a test smelt of the magnetite ore prepared the day before.

The second full day started with the preparation for another smelt using a different magnetite ore. Insights (??) from the first smelt were applied to the second. (It was decided that we had done too good a job high grading the ore the day before, resulting in virtually no slag bath in the furnace.) Again this started with ore crushing while the furnace was given some minor repairs and generally set up. Just after lunch we started this second smelt. Therese and I undertook the charging cycles, with Lee making the control decisions. (This makes smelt 50 for me.) The experience from the day before obviously paid off - sort of. The iron ore was most definately reduced to metal, but the result was a higher carbon cast iron rather than a forgeable bloom.
This turned out to be not the problem it might of been, as Jesus was interested in examining a theoretical Japanese sequence. He explained that historical blades were visibly different than those using even the 'traditional' Tatara method (post 1700). The theory is that ore was converted into a cast iron, then that was placed in a secondary hearth set up to *reduce* the overall carbon content as billets were created. In the background, Jesus, Shelton Browder and Steve Mankowski constructed a medium sized refining hearth to test just this method. (Expected to run on day three).


Of course there is always a lot of mixed conversation between various of the assembled team. These off the cuff discussions are always extremely valuable for how we share insights, experiences - and common problems to us all.

(I may edit this posting later when I get some images ready to insert)

Wednesday, March 14, 2012

Washington Cathedral

(Day 28)

As the combined Smeltfest 2012 and research trip proceeds, I will only have spotty internet access - via my lap top. So postings may be less frequent and shorter...

Today I drove into Washington from Winchester, and spend most the day at the Washington National Cathedral.

Now this is an impressive building in almost every way. My intent on visiting was to examine the forged metalwork there, primarily by legendary artisan blacksmith Samual Yellen. Over the course of some four hours, I took over 120 images. These were both complete pieces, but also many close up details. Those images are the kind of thing that revel many things about the construction of the pieces, and individual shapes and processes used. Many discoveries!

These are just a couple of samples:

Around the main entrance to the Cathedral, there are a number of roughly 4 foot wide by 6 foot tall panels, all by Yellen. Each shows a distinctive design. This is a detail of the main fill of one of these. The heavy rings are held by a series of looped over elements, each end forged by splitting into a crescent. These are wrapped around the rings while hot. The end result is that each of the rings is actually free to move, making the panel slightly flexible.

This is a railing to one side of a set of stairs leading downwards to the 'crypt' level, this in the NE corner of the building. You can see the very organic lines. The hand rail on the opposite side of the stairs uses the same flat bar with double lines hammered in. The uprights and supports are quite different however.

This is the famous 'Good Shepard' gate by Albert Pailey. (Most all smiths would recognize it!) This is a view of the *rear* of the gate, not usually ever seen. To give you some idea of scale of this work, the majority of elements seen here are forged from starting stock that looked to be 1/2 to 5/8 thick - and four inches wide.

Tomorrow is a slower trip down to Lexington

Monday, March 12, 2012

Departing for SMELTFEST 2012

As part of the overall project grant, I had included funding for my annual participation in SMELTFEST.
This event is hosted by Lee Sauder, at his workshop outside of Lexington Virginia. This is an invitational research / workshop session that includes many of the primary members of the North American 'Early Iron' movement every year. Past investigations have developed many of the standard methods used for practical bloomery iron furnaces.

Investigating the Aristotle Furnace, Smeltfest 2009
(L-R: Shelton Browder, Lee Sauder, Dick Sargent, Skip Williams, Steve Mankowski)

March 16 through March 19 - Smeltfest 2012
This is a bit shorter than in past years. With the support of the OAC grant, I have added some additional research stops on to the travel back and forth from Wareham to Lexington:

March 15 - National Cathedral, Washington DC
The National Cathedral has commissioned a number of significant pieces by artisan blacksmiths over the decades. There are pieces by Yellen, Pailey and others. Seeing these works by the very best North American artisan smiths has long been on my list.

March 21 & 22 - Colonial Williamsburg and Jameston Settlement VA
Most specifically I intend to visit the
DeWitt Wallace Decorative Arts Museum and the Abby Aldrich Rockefeller Folk Art Museum. It is some years since I have viewed either collection, and I am most interested in looking at their antique ironwork with more experienced eyes.
Jamestown itself is where the second attempt at smelting iron was undertaken in North America (*). In our last visit to the site (2008), we helped archaeologists there assess their current excavations of the bloomery furnaces. It will be interesting to see how the program has developed since then.

March 24 - Corning Glass Museum NY
As we swing back north, its only a short detour to take in this facility, which I have wanted to visit for years. Another research project I have been working on is Viking Age glass bead production methods. I hope to spend at least some time in the library there. More directed to the Bloom To Bar project, I have several concept designs to combine hand blown glass with bloomery iron. An overview of the possibilities of contemporary art glass will be helpful for imagining those pieces.

I expect to be able to maintain internet access throughout the trip. With luck I should be able to maintain the flow of blog posts here, with some highlights of my discoveries illustrated.

* The first processing of iron ore in North America was of course by the Norse at Vinland - L'Anse aux Meadows NHSC.

Sunday, March 11, 2012

the Aristotle Furnace

(Day 25)

Yesterday I undertook a demonstration / hands on session at the monthly meeting of the Ontario Artist Blacksmith Association. I had been part of the team that researched the working system for a small re-melting furnace (Smeltfest 2009). This is a simple to build small furnace, economical and fast to run. It will convert almost any iron based material (scrap, alloy, carbon content) into a small puck of bloomery like material with a mid to high carbon content. This allows someone to experience the unique textures of bloomery iron - without the effort and expense of a full sized iron smelt.

After an overview and demonstration of the process, I invited individual participants to run a furnace cycle and produce their own puck of metal. Seven individuals took part - with excellent results every time! The blade smiths gathered where particularly interested, as the application to their work was obvious.


Observing the furnace, near the end of a cycle.
Both these fellows would take turns making their own 'puck'.

I had prepared a short handout to distribute. As travel, timing (and luck) would have it, I was not able to get photocopies made in time for the demonstration. The handout is duplicated below. It will also be available as a PDF download. (Links will be placed on my regular blog, my iron smelting web site, and the OABA web site.)


The Aristotle Re-Melting Furnace


A simple way to make bloomery type carbon alloys

This furnace is based on the writings in Aristotle's "Meterologica' and later Ole Evenstad's descriptions in the 1780's.
The original concept belongs to Skip Williams, who then introduced a prototype to the Early Iron group a Lee Sauder's Smeltfest event in 2008. At Smeltfest 2009, our team concentrated specifically on the working dynamics of the Aristotle Furnace, with over 30 individual test firings.

The furnace is build like a miniature short shaft smelter. A standard 2 litre plastic pop bottle makes a good internal form. The ideal material for the walls is a 50 / 50 mixture of dry shredded horse manure mixed with powdered potter's clay.
A standard carpenter's pencil, or a piece of 3/8 rod is used to make the blast hole.
Critical measurements are :
1) the angle of the blast hole - at 20 to 25 degrees down from horizontal
2) the depth of the furnace floor below the blast hole - at 5 - 7 cm
3) height above the blast hole - at about 20 cm

A single firing consumes about 2 kg (standard galvanized pail) of charcoal over 25 - 30 minutes. The fuel should be broken to 2.5 cm or smaller, with dust screened out.

Temperature is determined by consumption rate, in turn modified by volume of the air blast. Ideal consumption is roughly 200 gms every 4 - 5 minutes (determined by timing a standard measure - a standard coffee holds about 200 gm)

The raw material can be almost any iron source. At first it is suggested that short lengths of standard 3/8 - 1/2 mild steel bars be used. Cut this into roughly 15 - 20 cm lengths, a total of 600 - 800 per firing.

Each bar is placed roughly 1/3 the distance back from the blast hole side, deep enough into the charcoal that the pieces hold it upright in place. The pieces are then allowed to descend as the charcoal level drops. Keeping the furnace full of charcoal, new bars are added as the previous ones drop below the upper surface. The last bar is covered with a last addition of charcoal, then the surface level is allowed to drop, burning the remaining fuel.

At this point a pointed hook can be inserted underneath the 'puck' of collected bloomery steel. It is a good idea to scrape out any slag that has gathered in the bottom of the furnace, then the whole can be re-filled with fuel for an additional process.

The result is a mid to high carbon metal, with the physical texture characteristics of bloomery iron. The created 'puck' typically weighs about 500 - 600 gms (65 - 75% yield). Once consolidated, this enough material to make two 4 - 6 inch long tanged knife blades.


Descriptions and further reading on the Web:

"Teeny-tiny Bloomery"
by Skip Williams

"A different way to make steel"
by Jesus Hernadez (on 'Don Fogg's Knife Forum')

Aristotle's Steel

by Lee Sauder (PDF download)

"Steelmaking in a tiny open furnace"
Donald Wagner (This is a photo essay from the same event that Lee's article above was based on.)

Part of the OAC Crafts Projects Grant

Friday, March 9, 2012

Aristotle Furnace - Demo / Workshop

March 10, Ontario Artist Blacksmith Association, Guelph Ontario


'Building and Operating the Aristotle Furnace' - Darrell Markewitz

This will be a practical demonstration and participant workshop session held as an additional part of the regular monthly meeting of OABA. The Aristotle Furnace was first introduced by Skip Williams at Smeltfest 2008 and further refined during Smeltfest 2009. It is a small table top re-melting furnace which easily allows the production of a small cake of bloomery type metal - ideal for bladesmithing. It will convert any scrap iron material into a roughly 0.5% carbon metal, but with the stringy slag inclusions of a 'wrought iron' type. Each operation cycle consumes roughly 2 kg of charcoal over about 25 minutes, yielding a mass roughly the size of a hockey puck.

Lee Sauder working with an Aristotle Furnace - Smeltfest 09

Darrell will demonstrate the layout and working of the furnace, and provide enough materials for a number of people to actually try making their own 'pucks' (as time permits).
This demonstration is offered as part of his current 'Craft Project - Creation & Development' Grant via the Ontario Arts Council - Government of Ontario

Thursday, March 8, 2012

..But sometimes you just might find (?)

(Day 22/23 *a)

A second stab at creating a starting billet that would lead to one of the blades described earlier.

The key to getting this concept to work as envisioned is to actually intentionally be sloppy with the initial compaction steps. (At the risk of sounding arrogant, after so many years in the forge I find it hard to *purposefully* use bad technique - even when the desired effect calls for it.)


These are the two starting masses from Smelt 49, November 2011. This was a 'slag pit' furnace set up (rather than our usual 'slag tapping' type. Ore used was industrial taconite, with a 33% return yield of 6.4 kg total.

The starting bloom fragment weighed 573 gm, roughly fist sized (seen at the left, above). First heats were taken at welding temperature, with the two flatter surfaces worked and the edges left largely alone. Then the piece was worked on the air hammer into a flat plate.


From there the plate was cut with the hydraulic press. At this point the pair of pieces have the profile I had initially projected for the blade project : One more or less solid, straight edge, against a more ragged and irregular opposite. One of the pieces also has a major crack across it (right above), but I have decided just to leave this as is. The weight at this point is 433 gm.


Cutting the larger piece would be the first 'production' use of the new hydraulic forging press, built specifically for this project. *b


The starting mass (bulk of the bloom) was 4652 gms. The cutting process also compressed the spongy bloom slightly (no specific compression was undertaken). The bloom had been placed with the normal 'planno' surface downwards for the cutting. The roughly oval shape was first cut side to side, then the two half sections were then cut into two pieces. As expected, the pieces are only roughly quarters. As seen in the image above, the two pieces on the left are slightly denser than those seen on the right. The piece in the lower right is the most fragmented, the one on the upper left the most solid. I expect there will prove to be a variation in carbon content between the pieces as well.

Next step with these pieces is to consolidate each into working billets.


* a - The ordering is going to get messed up here! I was in the process of working this post up on day 22 when David Robertson showed up for our planned workshop day with the hydraulic press (more to come on that). So I finished this posting off the next morning (you will see two on Friday March 9).

*b - There have been a number of general descriptions of the work I've undertaken to convert a commercial 30 ton log splitter into a forging press , available on my longer term blog 'Hammered Out Bits' :
Log Splitter to Hydraulic Press
Hydraulic Forging Press (continues)

This work started before the project grant had been awarded.

Tuesday, March 6, 2012

You Can't Always Get...

...what you WANT
(But if you try some times...)

(Day 20)

This is a look at what happened yesterday in the forge.
If you check back to yesterday's posting. You will see that the concept I had come up with was to take one of the smaller, more compact looking blooms and layer it up on to a carbon steel core. The intent was to preserve the ragged edge into the finished object.


The bloom I chose for this was the one from Smelt 14 - at Dan Nickel's 'Folly at the Forge' event. (Black Rock Forge - Traverse City MI, February 2006. The story of that smelt is an interesting tale of endurance, it was 20 bellow F when we started!) The piece was a fragment at 485 gm off a much larger bloom. As we had forged down the full bloom to bars at the event, I knew the material was a 'nice workable iron' (from my notes).

As it was about fist size to start, it easily fit inside my two burner propane forge to pre-heat. This allowed me to bring the core up to temperature more slowly. Also allowed this process to take place while I was getting my main coal forge set up and started. All the actual forge work was done in the hotter coal fire.
(Note that I have altered this image in an attempt to get it closer to the actual colours you would have seen. The camera 'sees' down into the infra-red differently than the human eye does. The actual colour would have been a 'bright orange'.)
This is the end result of the initial flattening stage. I worked the raw bloom starting at a welding heat. I took two heats working with the hand hammer, concentrating mainly on the flatter of the rectangular sides. Then I took several heats on the air hammer, again starting with welding each time. The action there was primarily to draw the rectangle down to a wide and thin flat bar.
Here you can see the results after being cooled and cut into two fairly equal pieces. The loss from bloom to this stage (as you can see) was down to 394 gms

Thats a total loss of 91 gm, or about 20%.
The metal at this point still had some fissures in it, especially along one edge. If I was really trying to make a solid working bar, I would have collapsed the bloom into a square cross section, allowing me to work all four of the edge surfaces (instead of just concentrating on two). I would have undertook at least one more weld series. My estimate is that the total loss would have been closer to 25 %


The two bloom iron plates were roughly 1 3/4 inch wide x 3 3/4 long x 1/4 thick. I took a piece of standard 1045 middle carbon spring steel (new leaf spring) and placed it as a core. A working handle was MIG welded to the spring. I then tack welded the three pieces together at the far end. You can see that the central cut end of the bloom plates was placed at the far end.
(I normally wire together my starting layers. Also I like to weld from the far end back towards my body. Just habits!)
At this point there was a total of 643 gms of material, the stack was roughly 3/4 inch thick.You can see that the spring was a bit wider, at 1 3/4 inch. I left the plates all even on the 'cleaner' edge of the bloom pieces. (Remember a ragged effect was my initial goal.)


The finished result.
This billet is roughly 8 inches long (with the more or less pointed end) x 1 3/4 at the base x 3/8 thick. I have given it a fast surface clean on the high speed sander. Although there are certain to be some flaw lines, generally the surfaces are welded fairly tight.

Although this billet will certainly work up into a potentially quite nice blade, it is not quite 'what I need'.

Back to the pile for another attempt...

Monday, March 5, 2012

Object Ideas - (2)

(Day 19)

With the power of the hydraulic press still a couple of days from securing, I will be starting with some of the smaller blooms / bloom fragments. Those are small enough to work with hand power - or under the smaller die size of my air hammer.

I was thinking of something that would both serve as a warm up towards the larger scale work to come, plus would yield up an interesting object. Another advantage of a smaller scale is that I will be able to work in my existing bottom draft forge. (Later I expect I will have to convert this over to a larger scale, side draft arrangement.)

The answer I decided upon was blade work:


The overall lines of these possible pieces actually comes from Bronze Age Greece. The artifacts are small one piece general purpose knives, with blades about 4 inches long. In terms of the profile, I thought to change the proportions to create a very wide and stubby blade, but retain the sweeping curves. This is a general profile I have worked with many times before - and have had great results.

The concept is to take one of the smaller bloom fragments, perhaps one of the cut sections. That would give me a piece with one more or less flat, and relatively dense surface. This I would flatten slightly, then cut in two down the centre of the flat side. The result of this should be two pieces, each of which will have a wide flat side plus a relatively flat edge. The opposite edge should retain the irregular surface originally on the outside of the bloom.

These two slabs would then be welded on to a separate core piece of a middle carbon spring steel, a bit wider than the bloom pieces. If the correct sizes are matched, what should result is one more or less 'clean and tight' edge, and one ragged edge. The two surfaces of the block would be hard and dense along one side, but become irregular to the other side.

This I would then forge up into the finished blade profile.
On polishing, what should result is a hard and even bottom edge. When ground, the bevel shape created will expose the harder carbon steel core for the cutting blade. Along the back, the material should appear pitted and irregular - a feature from the bloom iron source of the material.

Stay tuned to see what becomes of this grand concept...


The equipment preparation part of this project is dragging on longer than I had hoped. The new dies for the hydraulic press are ready, but there is one last bit of the conversion of that piece of equipment that needs to be finished. It is powered by a gasoline engine, and with the modifications, right now the exhaust blows straight back on to the operator. Although I have run it a couple of short sessions just to ensure everything is working, I really can not work seriously with the blooms on this machine until I install some venting. I need to purchase some metal hosing for this purpose, hopefully over the next couple of days. Sometimes rural living really slows down sourcing any 'unusual' parts or supplies purchases. (Big joke around here is "What are you using it for - this time?")

Sunday, March 4, 2012

Hold Me, Squeeze Me...

(Day 18)


Today's work in the forge was making up some special bloom holding tongs. If you click on the image above, you will see the spread of sizes at about half life size. The tongs are positioned so they are at their optimum size (ie - comfortable in the fist).
I had a large gap! The largest pair, antique hand forged wrought iron, hold about 4 inch diameter. The pair to the right (industrial, factory made) are set for about 1/2 inch diameter. This was just too wide a gap. You can see the new tongs (straight out of the slack tub in the photo) are set for roughly 2 1/2 and 1 inch material.
Working with Lee Sauder and Mike McCarthy on blooms at our yearly 'Smeltfest' workshop session, I certainly have learned that tongs with pointed tips give the best grip on the irregular surface of a bloom.

Although the new tongs I've made today are hardly elegant, I chose the particular style (contoured from rectangular bar stock) quite purposefully. Yes, although there is more drawing out to do (for the handle ends), in truth this style is easier to make than the more standard 'weld reigns to jaws' type. This more primitive tong also happens to be the type most typical of Viking Age tools. So I was looking ahead to some smithing work I hope to do with Mark Pilgrim at L'Anse aux Meadows NHSC - when DARC presents there this July.

Friday, March 2, 2012

Why Bloom Iron ?- Four


The most obvious characteristic of bloomery iron is its distinctive
texture.

2011 - Bloom Iron Bowl - forged bloomery iron - L 20 cm

As was mentioned in the Feburary 29 post, one of the major differences between bloomery iron and modern industrial steels is that the formation process used in a bloomery furnace always leaves glassy slag trapped within the metallic matrix.
Just how *much* slag is mixed in with the metal from an individual smelt will depend on a large number of factors : type and quality of the ore, furnace design and working sequence. Loosely it is the experience and the skill of the smelt master which defines all the variables. Reguardless, the desired result of any smelt attempt is to produce the highest yield with the least amount of fuel expended - and the densest bloom possible.

Bloom Iron Bowl was forged from a one quarter section of a bloom created in 2005. In this case I wanted to retain as much of the surface and edge texture as possible. For that reason, the cut section from the parent bloom was not subjected to the normal compressing, folding and welding steps. Since the ideal working bar would retain as little slag as possible, there might be several courses of these steps in the 'bloom to bar' process.

Cutting the 7.5 KG bloom
Shot with available light to show the metal heat.

The starting piece was a rough pie shape, with two edges the cut surfaces of the inner portion of the bloom. The other edges were the more ragged external surfaces of the original bloom.
By taking this segment , then basically hammering it flat down into a plate, all the slag inclusions and the bloom's starting ragged edges were retained.
The next step in the process was to take the two more or less flat surfaces of the plate and polish them roughly smooth with an angle grinder.
Once this was done, the plate was again heated to forging temperature, and worked with ball surface hammers over dishing forms to create the overall bowl contour.
The last step was to use a wire brush to clean the fire scale off the inner surface of the completed form. This polished the metal to 'bright', thus raising the contrast between the metallic and darker slag pockets.

Bloom Iron Bowl is an excellent example of the special physical composition characteristic distinctive to bloomery iron.


I should mention that this specific aspect of bloom iron - the possibilities of the unique texture - was first illustrated to me by the work of Lee Sauder


Detail of Tension Deficit by Lee Sauder

Thursday, March 1, 2012

All the Myriad PIECES...

Now that the layout table is not needed for the assembly of the hydraulic press (being modified specifically for this project), it was time to empty the milk crates full of blooms:

Click to *greatly* enlarge

Yesterday's work in the shop consisted of sorting all the pieces into historical order. Each piece was then photographed and weighed. There are over 60 individual pieces, ranging from full sized blooms (the largest at over 7 KG), down to small fragments. With luck even the small pieces can be welded as part of stacks towards creating layered steel billets.

I also spent a good hour attempting to work out some kind of useful method of measuring the volumes via water displacement. This in aid of determining the density of each bloom. This may not be critical towards artistic use of the individual blooms. However, keeping my archaeological slant in mind, once compaction and forging into working bars starts, the original density information will be lost. Better to record seemingly useless information - than work past it had find out later the data was significant.

Although I really have made a serious attempt to keep each bloom labled, what I found was that the process of shifting around sharp edged metallic blooms had shredded bags and obscured lables. There are a number of pieces that obviously have been mis-labelled, a few (some of the largest!) with no labels at all. At least one distinctive bloom is missing from the pile.

I am attempting to keep notes relating the specific process used to create an individual bloom / bloom fragment to the compaction to bar process. Most specifically as it relates to individual carbon content and general ease of forging.

Believe it or not - there is a very large consideration here - aspects of which I intend in addressing in future postings...

February 15 - May 15, 2012 : Supported by a Crafts Projects - Creation and Development Grant

COPYRIGHT NOTICE - All posted text and images @ Darrell Markewitz.
No duplication, in whole or in part, is permitted without the author's expressed written permission.
For a detailed copyright statement : go HERE